
The Best Red Velvet Oreo Cheesecake: A Sweet Adventure
There are moments in life that are defined by the sweets we enjoy. For me, one of those moments was the first time I stumbled upon a red velvet Oreo cheesecake. I remember it vividly; it was a chilly evening, and the recipe was whispered to me by a friend who swore it would ‘change my life.’ At first, I raised an eyebrow—sure, how good could it be? But then, as the scent of baking red velvet swirled through my kitchen, mixed with the rich aroma of cream cheese, I began to see the light. Honestly, what I didn’t expect was that this cheesecake would be the highlight of many family gatherings, cozy date nights, and even the odd cringeworthy celebration when I attempted to impress guests.
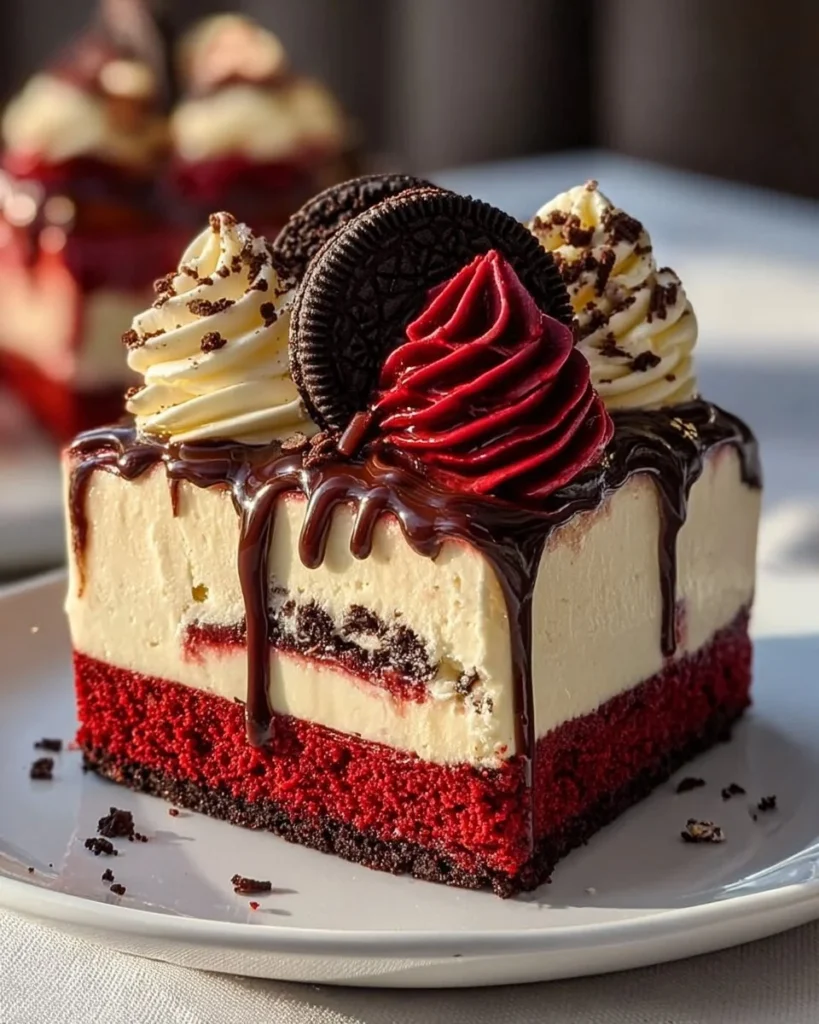
This best red velvet Oreo cheesecake isn’t just a dessert; it’s a treasure trove of memories and a comfort food that feels like a warm hug on a cold day. The rich, velvety texture of the cheesecake layered atop a crumbly, buttery crust of red velvet cake and Oreo cookies makes every bite a delectable experience. Who knew a cheesecake could make you feel so giddy?
And let’s be real for a moment: who doesn’t want to impress their friends with something that looks like it came straight out of a gourmet bakery? You’ll be surprised at how easy this recipe is, and you’ll definitely want to keep it in your back pocket for those moments when you just need something indulgent. It’s perfect for those easy weeknight dinners that leave your guests oohing and aahing over their plates. As someone who has faced the chaotic dance of burnt cookies and soufflés gone wrong, trust me when I say mastering this cheesecake is a total win.
So, grab your apron, and let’s dive into this delicious adventure of making the best red velvet Oreo cheesecake together!
Why You’ll Love This Recipe
- It’s a Showstopper: This cheesecake looks like it came from a bakery—hello, Instagram-worthy!
- Comfort Food at Its Best: Each bite is creamy, rich, and absolutely comforting.
- Leftovers (if there are any) are Amazing: One slice usually leads to another, but if you can resist, the leftovers are just as divine.
- Picky Eater Approved: Red velvet and Oreos? No one can argue with that combo!
- Perfect for Meal Prep: Make this a day in advance and let the flavors meld overnight for even better taste.
When I serve this cheesecake, I often hear my friends exclaim, “Ugh, why does this taste so good?! I don’t even like cheesecake!” It’s that kind of dish—the one that surprises and delights, and it feels like a warm hug after a rough day.
What Makes This Recipe Special?
The magic of this easy high protein high calorie meal lies in its unique combination of flavors and textures. The crunch of Oreo cookies contrasts beautifully with the fluffy richness of the cream cheese, while the subtle hint of cocoa from the red velvet cake creates a complex yet harmonious flavor profile.
I often think about my first attempt at this recipe. My ingredients were all set, and I felt like a pro chef. Fast-forward through some cursing and flour on the floor—yes, I may have made a mess—but it turned into an unforgettable family dinner. I whipped out this cheesecake, and everyone, including my skeptical brother-in-law, was utterly enchanted.
There’s just something about the combination of red velvet and Oreos that makes this dessert stand out. It’s a classic with a twist, and the rich colors are perfect for any occasion, whether it’s a holiday celebration or a Tuesday night treat.
Ingredients
To make this best red velvet Oreo cheesecake, here’s what you’ll need:
- 2 cups red velvet cake crumbs: Use a freshly baked red velvet cake or store-bought if you’re in a pinch. The texture adds a lovely lightness to the crust.
- 1/2 cup unsalted butter, melted: This will bind the cake crumbs together and give our crust that delightful buttery richness. Don’t skimp on this!
- 1 cup Oreo cookie crumbs: These add crunch and a punch of flavor. Feel free to use any chocolate sandwich cookies you fancy!
- 16 oz cream cheese, softened: The heart of our cheesecake; it should be at room temperature for easy mixing. Look for full-fat for that creamy texture.
- 1 cup granulated sugar: This sweetens our filling, balancing the tanginess of the cream cheese.
- 1 teaspoon vanilla extract: Because every dessert deserves a hint of fragrant vanilla!
- 3 large eggs: These help set the filling as it bakes, giving it a nice structure.
- 1 cup sour cream: This adds a zingy creaminess that makes your cheesecake feel silky and luxurious.
- 1/2 cup heavy cream: For an extra-rich filling, heavy cream contributes to the dreamy texture.
- Oreo cookies for decoration: A fun and delicious way to finish this cheesecake!
As you gather these ingredients, I encourage you to go for quality. It might be tempting to grab the store brand, but trust me, this is one recipe where you want to splurge a little. Oh, and one tiny tip—avoid using expired cream cheese; you’ll thank me later.
How to Make It Step-by-Step
Now let’s roll up our sleeves, put on some tunes, and dive into making this fabulous cheesecake! Follow me through this sweet adventure:
-
Preheat the Oven: First thing’s first—set your oven to 325°F (160°C). This initial heat will be perfect for baking our cheesecake evenly. While it’s warming up, I like to tidy up my kitchen chaos (you know, the mysterious cake flour clouds and stray crumbs).
-
Prepare Your Springform Pan: Grease a 9-inch springform pan so your cheesecake won’t stick. I use non-stick spray, but making it a bit fancy with some parchment paper isn’t a bad idea either.
-
Mixing the Crust: In a mixing bowl, combine those glorious red velvet cake crumbs with melted butter. You want a consistency that clumps together like wet sand when pressed. Spoon the mixture into your springform pan and press it down firmly. I like to use a measuring cup for this—it’s the perfect shape!
-
Whip the Filling: In another bowl, beat the cream cheese until it’s nice and smooth, like butter on warm toast. Add the granulated sugar and vanilla extract, and mix until combined. Not gonna lie, this smells divine—though it’s tempting to eat all the cream cheese here, remember we need it for the filling!
-
Adding the Eggs: One by one, beat in the eggs. I like to add them one at a time, ensuring each is fully mixed in before adding the next. You’ll want to avoid overmixing here; nobody wants a rubbery cheesecake.
-
Incorporate Creaminess: Now, mix in the sour cream and heavy cream until everything is silky smooth. The filling will be lush and almost irresistible at this point.
-
Assemble the Cheesecake: Carefully pour this dreamy filling over the crust in your springform pan. Give the pan a gentle jiggle to level everything out—this baby is about to get baked!
-
Baking Time: Pop the cheesecake into the preheated oven and bake for about 55-60 minutes, or until the center is set but still slightly jiggly. Make sure to keep an eye on it; you don’t want to overbake and wind up with a dry cheesecake.
-
Cool and Chill: Once baked, turn off the oven and crack the door open, allowing the cheesecake to cool gradually. Once it’s cooled, pop it into the fridge for at least 4 hours, or preferably overnight. You want those flavors to meld together. It’s killing you to wait, I know!
-
Finishing Touches: Before serving, decorate your cheesecake with crushed Oreo cookies. This step is crucial! Not only does it look fantastic, but it also adds that extra crunch we all love.
And there you have it! Your own luxurious red velvet Oreo cheesecake, baked and chilled to perfection.
Tips for Best Results
- Room Temperature Ingredients: Ensure all your ingredients are at room temperature before you begin. This allows for smoother blending and prevents lumps in your cheesecake.
- Don’t Overmix the Eggs: Add them one at a time and avoid overmixing. Overbeating can introduce extra air, causing cracks in your cheesecake while it bakes.
- Checking for Doneness: If you’re unsure if your cheesecake is done, gently shake the pan. The center should have a slight jiggle, but the edges should be set.
Ingredient Substitutions & Variations
- Gluten-Free Option: Swap the red velvet cake crumbs with a gluten-free red velvet mix and use gluten-free Oreos for the crust.
- Dairy-Free: Try using vegan cream cheese and coconut cream as a substitute for heavy cream and sour cream.
- Flavor Variations: Add a touch of espresso powder to the filling for a mocha twist or swirl in some chocolate ganache for an extra indulgent treat!
Directions
To sum it up, follow these steps:
- Preheat oven to 325°F (160°C) and prepare the pan.
- Make the crust with red velvet crumbs and butter.
- Mix the cream cheese with sugar and vanilla, then add eggs.
- Stir in sour cream and heavy cream, then pour over the crust.
- Bake for 55-60 minutes, cool, and refrigerate.
- Top with crushed Oreos before serving.
This cheesecake is perfection alongside a cup of coffee or a cozy movie night with loved ones—just imagine it!
Pairing Ideas (Drinks, Sides, etc.)
What pairs beautifully with a creamy slice of red velvet Oreo cheesecake? Think dark, rich coffee or a dessert wine if you’re feeling fancy. I also love pairing it with some fresh strawberries or raspberries on the side for an added fruitiness.
And let’s not forget—this cheesecake, a rom-com, and an oversized blanket is the ultimate comfort combo I didn’t know I needed!
How to Store and Reheat Leftovers
You’ll want to store any uneaten cheesecake in an airtight container in the refrigerator, where it’ll keep for about a week. You might even find that the flavors intensify after another day, making that next slice even more delightful than the first!
And if you’re like me, sometimes you’ll be tempted to devour it straight from the fridge at midnight. I won’t judge—you do you!
Make-Ahead and Freezer Tips
This cheesecake is an ideal make-ahead dessert! Prepare it a day or two in advance, and just add those Oreo decorations right before serving.
If you want to extend its life, freeze the cheesecake! To do this, wrap it tightly in plastic wrap and then in foil before putting it into the freezer. It’ll keep well for about 2-3 months. When you’re ready to enjoy it, simply transfer it to the fridge overnight to thaw.
Common Mistakes to Avoid
- Skipping the Cooling Step: Cooling your cheesecake in the oven before chilling helps prevent cracks.
- Not Using a Water Bath: Optional but recommended, a water bath can help maintain moisture during baking and create a silkier texture.
- Rushing the Chill Time: Patience is key! Giving your cheesecake ample time to chill will reward you with better flavor and texture.
Frequently Asked Questions (FAQ)
Can I bake this cheesecake in a regular pan instead of springform?
You can, but a springform pan makes it easier to remove and serve. If using a regular pan, line it with parchment paper to help with removal.
How do I know when my cheesecake is done?
Look for a firm edge and a jiggly center—if the edges are set and the middle still looks a little wobbly, you’re golden!
Can I add toppings?
Absolutely! Whipped cream, chocolate ganache, or even fresh fruit are great additions.
Cooking Tools You’ll Need
- Mixing bowls
- Measuring cups and spoons
- Electric hand mixer or stand mixer
- Springform pan
- Rubber spatula
- Parchment paper (if desired)
Final Thoughts
This red velvet Oreo cheesecake isn’t just about baking; it’s about creating moments and memories with loved ones over something scrumptious. The joy in seeing that first slice disappear is something I always cherish.
I would love to hear how your version turns out! Have your kitchen adventures ever gone haywire? Share your stories and let’s swap tips!
If you enjoyed this recipe, don’t forget to save it on Pinterest or share it with a friend! Let’s spread the cheesecake love!

Red Velvet Oreo Cheesecake
Ingredients
Crust Ingredients
- 2 cups red velvet cake crumbs Use freshly baked or store-bought.
- 1/2 cup unsalted butter, melted Binds the crumbs together.
- 1 cup Oreo cookie crumbs Feel free to use any chocolate sandwich cookies.
Filling Ingredients
- 16 oz cream cheese, softened Should be at room temperature.
- 1 cup granulated sugar Sweetens the filling.
- 1 teaspoon vanilla extract Adds flavor.
- 3 large eggs Help set the filling.
- 1 cup sour cream Adds creaminess.
- 1/2 cup heavy cream Contributes to the texture.
Decoration Ingredients
- as needed Oreo cookies for decoration Crushed for topping.
Instructions
Preparation
- Preheat the oven to 325°F (160°C).
- Grease a 9-inch springform pan.
Make the Crust
- In a bowl, combine red velvet cake crumbs and melted butter. Mix until the consistency clumps together.
- Press the mixture firmly into the prepared springform pan.
Prepare the Filling
- Beat cream cheese until smooth, then add sugar and vanilla, mixing until combined.
- Add eggs one at a time, mixing until just combined.
- Mix in sour cream and heavy cream until smooth.
Bake the Cheesecake
- Pour the filling over the crust and gently jiggle the pan to level it.
- Bake for 55-60 minutes, until the center is slightly jiggly.
- Turn off the oven and crack the door, letting the cheesecake cool gradually.
Chill and Decorate
- Refrigerate for at least 4 hours, preferably overnight.
- Before serving, decorate with crushed Oreo cookies.


