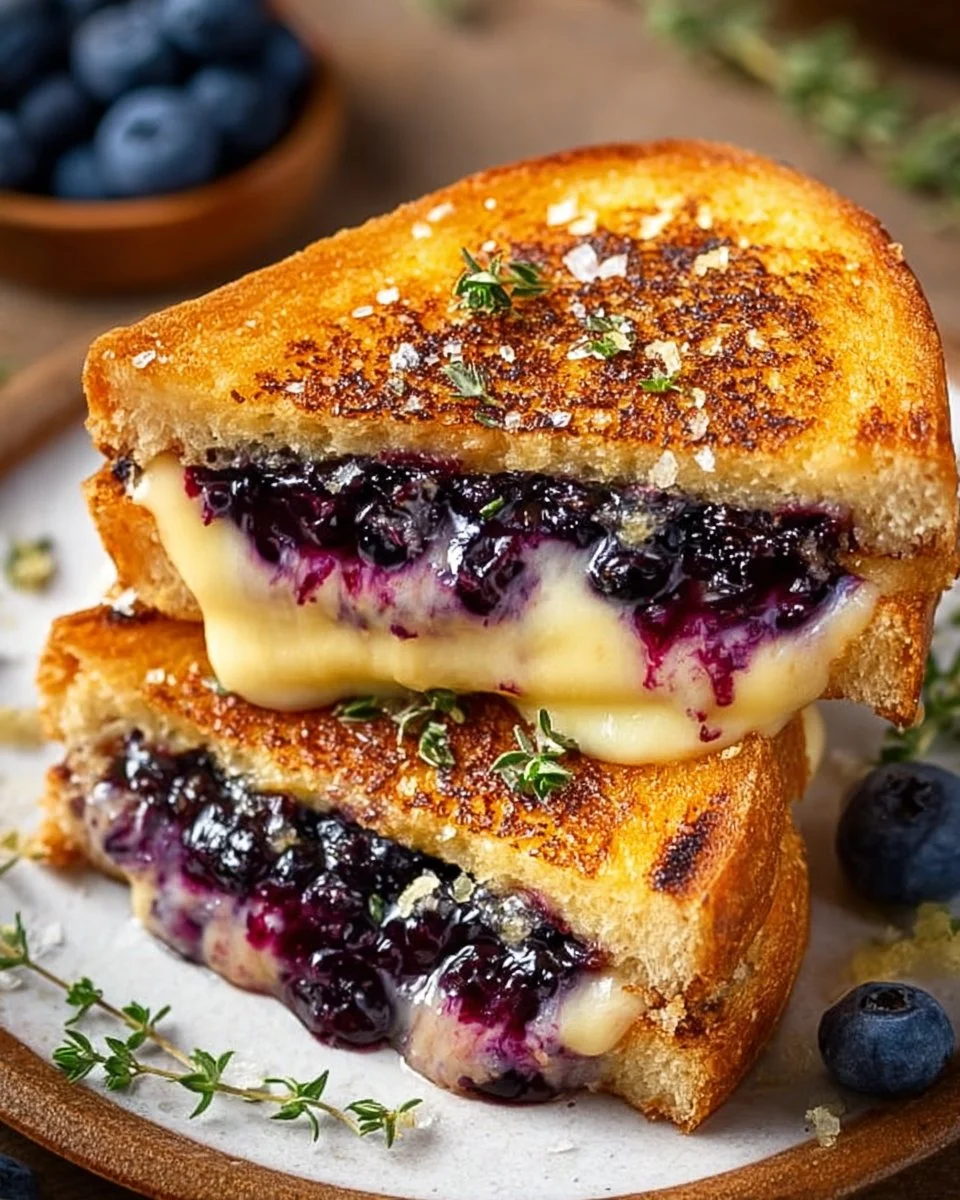
Easy and Delicious Juicy Blueberry Grilled Cheese
There I was, standing in my kitchen, staring at a pint of fresh blueberries that had somehow made their way into my grocery cart. Honestly, I had no idea what I was going to do with them. I mean, eating them as they are was on the table, sure, but I wanted something a bit more… inventive. And this is how the Juicy Blueberry Grilled Cheese was born. Bear with me while I paint a picture for you: scents of toasting bread competing with bursts of warm blueberry sweetness; the sound of sizzling butter lulling you into weekend bliss; and then, that first heavenly bite where sweet meets savory in a glorious, gooey embrace.
Now, let’s get real for a second. If someone had told me that I’d be tossing fruit into my grilled cheese, I would have chortled and thought they were completely bonkers. But, you know how it is; sometimes the kitchen chaos leads to the most magical discoveries. The moment I pulled the first slice out, the crispy exterior cracking slightly, and that warm, melted cheese drizzling out like syrup, I knew we had hit the jackpot.
This dish doesn’t just matter because of its unexpected twists. It’s about cozy nights at home, wanting something comforting without the guilt of excess calories. Plus, this recipe has become part of my family’s unofficial “comfort meal” rotation. It’s a little history, a little memory, and a whole lot of flavor – all in your own kitchen.
So, grab your favorite bread, toss those blueberries in a warm hug with cheese, and let’s make this happen!
Why You’ll Love This Recipe
- Quick and Easy: This easy weeknight dinner can be whipped up in no time. Honestly, it’s only about a 10-minute endeavor from start to finish.
- Healthy Comfort Food: Packed with juicy blueberries, it feels just a smidge more gourmet than your average grilled cheese, plus it adds a touch of nutritional value.
- Picky Eater Masterpiece: My kids devour this like it’s the last slice of cake at a birthday party. Score one for my mom-life!
- Perfect for Leftovers: You won’t feel guilty about the second round because it’s both low-cal and absolutely delightful when reheated.
- Meal Prep Wonder: Trust me, this one makes for some quick family meals throughout the week. It’s just as delicious reheated as freshly made!
- Emotionally Satisfying: This recipe is like a warm hug on a plate – cheesy, fruity, and buttery goodness that wraps around your heart.
What Makes This Recipe Special?
There’s something special about the juxtaposition of sweet, ripe blueberries with rich, melty cheese. It’s like a tiny party in your mouth where savory high-fives fruity sweetness. Not to mention that the simplicity of a grilled cheese sandwich transports us back to childhood, where food didn’t have to be complicated – just tasty. I mean, let’s face it, who can resist that?
One of my favorite tricks with this recipe is using the best quality cheese I can find. I personally go for a rich cheddar or creamy mozzarella, depending on my mood (and what’s lurking in my fridge). And then there are moments of sheer panic as I forgot to get butter from the fridge, leading to me frantically using margarine or whatever spreadable concoction I can find. That’s part of the fun, right?
Ingredients
- 2 slices of bread (your choice; I love sourdough or rustic multigrain for that delightful chewy texture)
- 1 cup of fresh blueberries (gotta make sure they’re ripe – you can even toss some extras in for flavor explosions)
- 1 cup of shredded cheese (cheddar if you want a zing, or mozzarella if you’re feeling creamy)
- Butter or margarine (I mean, this is non-negotiable for the perfect grill!)
- Optional: honey or maple syrup (if you want to take it to a whole new level of deliciousness)
Let’s talk about the bread for a sec. A thick-cut bread helps keep things from becoming too soggy and lets you get that mouthwatering crunch. And if you’re ever in the mood for a flavor upgrade, throw in some fresh herbs or a dash of cinnamon while grilling. Trust me, your taste buds will thank you.
How to Make It Step-by-Step
Alright, folks, this is where the magic happens. Time to roll up those sleeves and get your hands a little messy.
-
Heat It Up: Start by getting your skillet nice and warm over medium heat. I usually opt for a non-stick pan, as I want to avoid that dreaded cheese stickage fiasco. Seriously, nothing worse than cheese glue on your lovely skillet.
-
Butter It Up: Spread butter (or margarine, do as your fridge dictates) generously on one side of each slice of bread. I like to splatter on that buttery goodness like it’s a masterpiece because, you know, it is! You’ll want that golden crust – just trust me on this.
-
Layer It Up: Take the unbuttered side of one slice and pile on the shredded cheese like it’s the last cheese on earth. Then add in those fresh blueberries, nestling them lovingly in the cheese. Ah, the sound of blueberries plopping around is like music to my ears!
-
Drizzle of Heaven: If you want to sprinkle some honey or maple syrup, now’s the time. A little splash here goes a long way, believe me! Just imagine how that sweet note dances around with the sharpness of the cheese.
-
Top It Off: Place the second slice of bread on top with the buttered side facing outwards. It’s like a cheesy blueberry sandwich hug! Press it down just a tad to keep everything snug and cozy.
-
Grill Away: Pop that bad boy onto the heated skillet. As you delight in the sounds of sizzling, give it about 3-4 minutes. Peek underneath to see that lovely golden brown color slowly creeping up. Flip when ready, and do the same for the other side.
-
The Moment of Truth: Once each side is beautifully toasted and the cheese has reached that melty, dreamy state, pull it from the heat. This is where your patience pays off; let it sit just for a moment—if you can stand it!—then slice in half and serve warm.
Tips for Best Results
Want to elevate your juicy blueberry grilled cheese game? Here are my top nuggets of wisdom:
- Use a pan that retains heat well—cast iron works wonders here.
- Don’t skimp on the butter—seriously, that’s like the lifeblood of grilled cheese. Crispy bread is the goal!
- If you love a crunchy exterior, finish off with a sprinkle of coarse sea salt once it’s off the heat. You won’t regret it.
Ingredient Substitutions & Variations
Life throws curveballs, and so does cooking! Here are some ways to swap things up:
- Bread Options: Gluten-free bread works like a champ if that’s where you’re at; just watch it closely as it tends to cook faster.
- Cheese Variety: Try a fig or herb-flavored cheese for a unique twist. It’s like a gourmet adventure without leaving your kitchen.
- Berry Choices: If blueberries aren’t your jam (pun intended), strawberries or raspberries can also bring that perfect fruity touch.
Directions
For a quick glance at making this fantastic juicy blueberry grilled cheese, here’s a short recap:
- Butter one side of each slice of bread.
- Add cheese and blueberries to the unbuttered side of one slice.
- Drizzle with honey or maple syrup, if desired.
- Top with the second slice, buttered side facing out.
- Grill in a skillet until golden brown and the cheese is melted, about 3-4 minutes per side.
- Slice in half and serve warm.
Pair it with some fresh fruit or a salad on the side; this is where a light crunch can balance out the cheesy goodness. And let’s be honest—a rom-com and this grilled cheese may be the perfect pairing on a lazy Sunday afternoon.
How to Store and Reheat Leftovers
Okay, so let’s say you’re lucky enough to have leftovers (which is a feat all on its own). Here’s what to do:
- Refrigeration: Pop any leftover grilled cheese in an airtight container – those bad boys can chill for up to 3 days.
- Reheating: To reheat, use your skillet again. Let it warm slowly over a gentle heat; you want that cheese to melt again without turning into a soggy mess. If you’re in a rush, a microwave can work, but don’t blame me if it gets a little chewy!
Make-Ahead and Freezer Tips
While I wouldn’t exactly make-ahead a grilled cheese sandwich, you can prepare the ingredients ahead of time. Simply keep the cheese shredded and store the blueberries washed and ready to go. This way, when the craving strikes (which, let’s be honest, it will), you’ll be a few minutes away from cheesy bliss!
Common Mistakes to Avoid
Don’t let these rookie pitfalls get you down:
- Not Preheating the skillet: Seriously, if you toss that bread on a cold pan, all bets are off for that crispy crust.
- Too Much Cheese: While it’s easy to go overboard, remember that too much cheese can lead to a tragic overflow. You want melted magic, not a gooey explosion.
- Using Frozen Blueberries: Fresh is best! Frozen wouldn’t provide the same delicious texture and warmth, leading to a slightly juicier and messy disaster.
Frequently Asked Questions (FAQ)
Can I use other fruits?
Absolutely! Substitute with strawberries, blackberries, or even thin apple slices for a sweet crunch. Flexibility is key.
Can I make it vegan-friendly?
You bet! Use a plant-based cheese option and your favorite vegan butter.
What sides go well with grilled cheese?
Consider a light salad or a cup of tomato soup for that classic pairing, but honestly, it’s an all-star in its own right!
Is this recipe kid-friendly?
Oh, 100%! Kids go wild for the unexpected combination and you’ll feel like a superhero for serving it.
Cooking Tools You’ll Need
- Non-stick skillet or a cast iron skillet (that trusty workhorse!)
- Butter or margarine (let’s not forget that essential part)
- Spatula (no one likes a sandwich disaster)
- Knife for cutting (go nice and slow for those Instagram-worthy shots)
Final Thoughts
As I sit here reminiscing about the countless sandwiches I’ve grilled, I can’t help but feel a warm nostalgia for the adventure in the kitchen. It’s moments like these that solidify bonds, evoke laughter, and spark creativity.
These juicy blueberry grilled cheese sandwiches hold a special spot in my heart, and I’m excited for you to experience them too.
If you enjoyed this recipe, don’t forget to save it on Pinterest or share it with a friend!

Juicy Blueberry Grilled Cheese
Ingredients
For the Grilled Cheese
- 2 slices slices of bread (your choice; sourdough or rustic multigrain recommended) Consider using thick-cut bread for better texture.
- 1 cup fresh blueberries Ensure they are ripe for best flavor.
- 1 cup shredded cheese Cheddar for a zing or mozzarella for creaminess.
- Butter or margarine Essential for grilling.
- Optional: honey or maple syrup For an added layer of sweetness.
Instructions
Preparation
- Heat your non-stick skillet over medium heat.
- Spread butter (or margarine) generously on one side of each slice of bread.
- On the unbuttered side of one slice, pile on the shredded cheese and add the fresh blueberries.
- If desired, drizzle honey or maple syrup over the blueberries.
- Top with the second slice of bread, buttered side facing out.
Cooking
- Place the sandwich in the heated skillet and cook for about 3-4 minutes until golden brown.
- Flip the sandwich and repeat for the other side until the cheese is melted and both sides are crispy.
Serving
- Slice the sandwich in half and serve warm.