
Easy Strawberry Custard Delight Cake: A Tasty Recipe Guide
Let’s be honest: there are recipes that just beckon from the page, and then there are those that feel like a warm hug. Today, we’re diving into one of those cozy recipes that is not just a treat for the taste buds but also a beautiful sight in its own right: the Strawberry Custard Delight Cake. Trust me, this cake becomes an emotional centerpiece during gatherings, a conversation starter, and a nostalgic stroll down memory lane. My journey to mastering this delightful cake was nothing short of a rollercoaster ride filled with oops moments, sweet victories, and a hint of flour on my face (because who doesn’t love a little kitchen chaos?).
This recipe holds a special place in my heart; it’s a reminder of sunny afternoons spent in my grandmother’s kitchen, surrounded by the aroma of vanilla and a symphony of laughter. Honestly, I have vivid memories of her juggling cake layers and custard as if she were a magician performing her grandest tricks. And let me tell you, my first attempt at making it was nothing short of disastrous! I mistook salt for sugar (oops!), and I learned the hard way that too much anticipation can lead to a cake that’s more of a pancake than a fluffy delight. But with every messy attempt came growth, tweaking the recipe until it became the showstopper it is today.
As I sit here writing this surrounded by the enticing aroma of fresh strawberries, I can’t help but feel that this cake is a true masterpiece that connects generations. The sweetness of ripe strawberries combined with a silky custard nestled between moist cake layers creates a taste that feels like summer itself, even on the grayest of days. Whether it’s for a birthday, a family gathering, or an ordinary Tuesday that deserves some celebration, this Strawberry Custard Delight Cake is just the ticket.
Why You’ll Love This Recipe
- Nostalgic Flavor: Every bite takes you back to warm summer days filled with laughter.
- Impressive Presentation: This cake is the kind of beauty that creates “oohs” and “aahs” at every layer.
- Customizable: Replace strawberries with whatever seasonal fruit strikes your fancy; you can even consider a keto meal plan twist!
- Leftovers are a Plus: If you’re lucky enough to have leftovers, the flavors only deepen after a day in the fridge.
- Family Approval: Picky eaters in your household? This cake is a universal hit. Kids love it, and so do adults!
- Easy to Make: I promise it’s simpler than it looks; I’ve had my fair share of kitchen catastrophes!
So, get ready, grab your apron, and let’s dive into the luscious layers of this Strawberry Custard Delight Cake!
What Makes This Recipe Special?
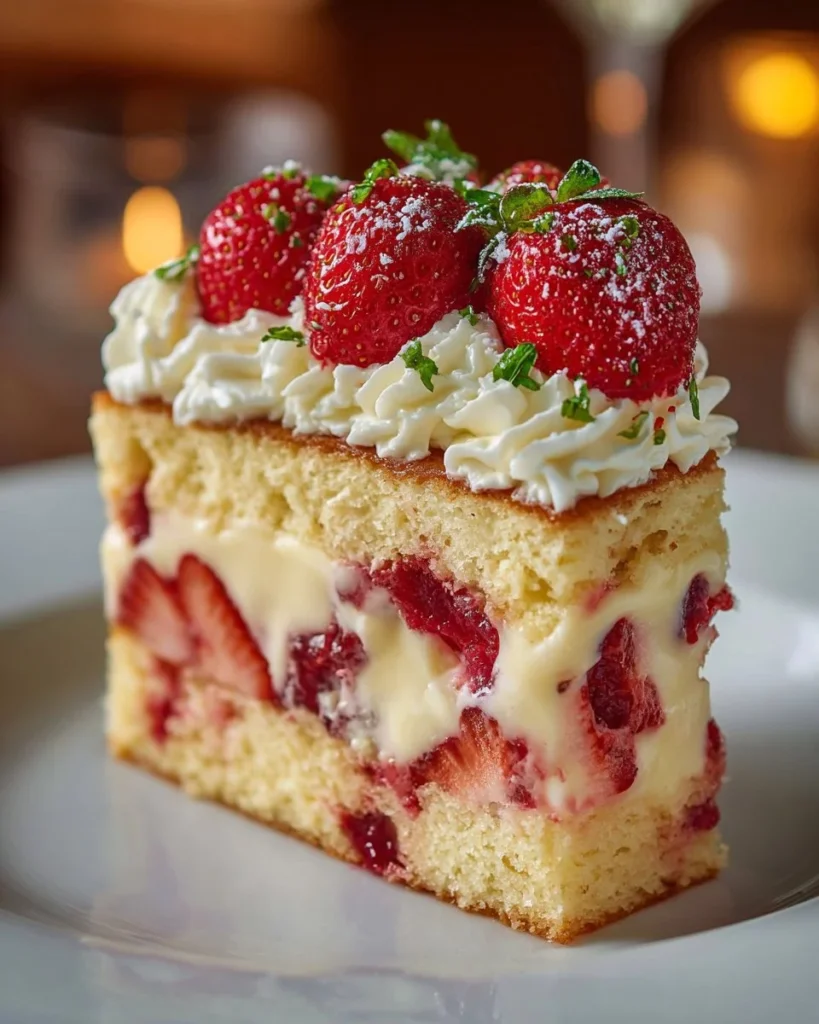
You might be wondering, "What sets this cake apart from all the other cakes?" Well, it’s all about the custard filling—it’s creamy, smooth, and velvety, bringing a unique twist to a standard cake. The combination of fresh strawberries with rich custard creates a harmonious flavor balance that is sweet but not over-the-top. The layering is like a form of culinary meditation, offering an opportunity to embrace the process of creating something beautiful, one layer at a time. Plus, the whipped cream garnishing at the edges offers a playful yet elegant finishing touch!
When you slice into this cake, not only do you see inviting layers, but you’ll also experience that magical moment when the custard oozes gently from between the layers as you serve it. It’s an experience that transcends taste and wraps you in warmth and comfort—definitely a cake that feels like home.
Ingredients
- 2 ½ cups all-purpose flour: The foundation of our cake; it provides structure—don’t skip this!
- 2 ½ tsp baking powder: This is our little magic powder that helps create fluffiness in the cake.
- ½ tsp salt: A sprinkle of salt enhances the sweetness; trust me, it’s necessary!
- 1 cup unsalted butter (softened): Because butter makes everything better! It adds richness and moisture.
- 1 ½ cups granulated sugar: Sweetness is key, and this sugar is what makes our cake a delightful treat.
- 4 large eggs: These little gems bind everything together and give the cake that incredible texture.
- 1 tsp vanilla extract: The soul of the cake! It brings warmth and depth.
- 1 cup milk: Dairy helps create a soft crumb; whole milk is best here.
- 2 cups whole milk (for custard filling): Extra creaminess for the custard, we want that velvety goodness.
- ½ cup granulated sugar (for custard filling): More sweetness to balance the flavors of eggs and vanilla.
- 3 tbsp cornstarch: This is our thickening agent—it’s essential for a stable custard.
- 4 large egg yolks: Separate these from the whites; yolks bring richness to your custard.
- 2 tbsp unsalted butter (for custard filling): A little bit of butter in the custard? Yes, please!
- 1 tsp vanilla extract (for custard filling): Again, this is all about getting that flavor cozy and deep.
- 2 cups fresh strawberries (diced, plus whole for topping): Fresh strawberries are the star of the show; they must be juicy and ripe.
- Whipped cream (for decorating): The final flourish that transforms this cake from ordinary to extraordinary!
A quick note: When shopping for ingredients, I’m an advocate for quality over quantity. Can we agree? For instance, try to use real butter instead of margarine. And fresh strawberries? The flavor and texture they bring are unmatched.
How to Make It Step-by-Step
Let’s get into the nitty-gritty of creating this masterpiece! Preheat your oven to 350°F (175°C)—it’s time to get the baking vibe going.
Step 1: Prepare the Cake Batter
Grab two 9-inch round cake pans—don’t forget to grease and flour them! This is crucial; you don’t want your gorgeous cake to stick to the pan.
In one bowl, combine 2 ½ cups of all-purpose flour, 2 ½ tsp baking powder, and ½ tsp salt. Whisk those together until well mixed; it should feel light and airy.
In another, larger bowl, cream 1 cup of softened unsalted butter and 1 ½ cups granulated sugar until it’s light and fluffy. Seriously, I recommend using a handheld mixer or stand mixer here to really get that air in. You want it to be creamy—like clouds of sweet butter.
Add your 4 large eggs one at a time, beating well after each addition. Then, throw in 1 tsp of vanilla extract and mix until incorporated.
Next up, alternate adding the dry flour mixture and 1 cup of milk, starting and ending with the flour. Mix until just combined—you don’t want to overmix because that leads to a dense cake and nobody wants that tragedy.
Step 2: Bake the Cakes
Divide your batter evenly between the two prepared pans and smooth the tops with a spatula. Pop those bad boys in the oven and let them bake for 25–30 minutes. Pro tip: While it bakes, enjoy that heavenly smell wafting through your kitchen—it’s the scent of happiness!
When a toothpick comes out almost clean (a few crumbs are okay), it’s time to take them out and let them cool in the pans for about 10 minutes. Then, run a spatula around the edges and turn them out onto a wire rack to cool completely. It’s like watching them transform into beautiful cake layers.
Step 3: Make the Custard Filling
While the cakes are cooling, let’s think about that custard, shall we? In a saucepan, warm 2 cups of whole milk—make sure to stir it so it doesn’t boil.
In a separate bowl, whisk together ½ cup granulated sugar, 3 tbsp cornstarch, and 4 large egg yolks until smooth.
Gradually pour that warm milk into the egg mixture while whisking continuously to avoid cooking the eggs. Return the mixture to the saucepan and cook it over medium heat, stirring constantly until thickened, about 5-7 minutes. You’ll know it’s ready when it coats the back of a spoon.
Oops! I remember when I first did this; I walked away for just a minute, and bam! The custard almost burned. Stay vigilant!
Once thickened, remove it from the heat and stir in 2 tbsp unsalted butter and 1 tsp vanilla extract. Cover with plastic wrap pressed against the surface (this prevents a skin from forming) and let it cool while you slice your cake layers.
Step 4: Layering the Cake
Here comes the fun part: layering! Using a serrated knife, slice each cake layer in half horizontally. This is where patience is key; make sure to keep an even hand—if the layers end up uneven, it might look less than perfect, but trust me, it will still taste divine!
Start with one layer on a plate. Spread a generous layer of custard on top, then sprinkle with diced strawberries. Honestly, don’t be shy with the strawberries; they’re the star of the show.
Repeat the process with the remaining layers. Once you’ve placed your final cake layer on top, spread the remaining custard over it. Then, for the finishing touch, decorate with halved strawberries on top and pipe some whipped cream around the edges. This is where you can unleash your inner pastry chef!
Step 5: Chill and Serve
Now, let the cake chill for at least 1–2 hours before serving. This chilling period helps the flavors meld beautifully, and it allows the custard to set properly.
The moment you cut into this cake is pure magic. You truly deserve to revel in the accomplishments of your hard work.
Tips for Best Results
- Use Room Temperature Ingredients: It’s a game-changer! Eggs and butter mix better when they aren’t cold.
- Don’t Skip the Cooling: Allowing the cake to cool completely protects that fluffy structure you’ve worked hard for.
- Flavor Variety: Get creative with the layers. Could be blueberries, raspberries, or even a chocolate custard base! This cake can be whatever you want it to be.
- Mixing Technique: Fold in flour carefully to retain air; this is what gives you that beautiful, airy cake.
Ingredient Substitutions & Variations
- Gluten-Free Version: Swap the all-purpose flour for a 1:1 gluten-free blend. I’ve tried this, and it worked wonders!
- Custard Variations: You can even experiment with flavors like lemon zest or almond extract in your custard.
- Dairy-Free Milk: If needed, oat or almond milk can replace the milk for the cake and custard—go for a creamy version for the best results.
Directions
- Preheat the oven to 350°F (175°C). Grease and flour two 9-inch round cake pans.
- In a bowl, whisk together flour, baking powder, and salt.
- In another bowl, cream butter and sugar until light and fluffy. Beat in eggs, one at a time, then vanilla.
- Alternate adding the dry mixture and milk until smooth. Divide batter into pans and bake for 25–30 minutes, or until a toothpick comes out clean. Cool completely.
- For the custard, heat milk until warm. In a bowl, whisk sugar, cornstarch, and egg yolks. Slowly pour in the warm milk while whisking.
- Return mixture to saucepan and cook over medium heat, stirring until thickened. Remove from heat, stir in butter and vanilla. Cover with plastic wrap pressed against surface, let cool.
- Slice each cake layer in half horizontally for four thin layers.
- Place one layer on a plate, spread custard, then sprinkle with diced strawberries. Repeat with remaining layers. Spread custard on top and garnish with halved strawberries.
- Pipe whipped cream around edges. Chill for 1–2 hours before serving for best flavor.

Pairing Ideas (Drinks, Sides, etc.)
This delightful cake goes well with a cup of tea or coffee, making it perfect for afternoon gatherings or cozy evenings. If you’re thinking about a dessert pairing, how about serving it with some homemade vanilla ice cream? Just picture it: a slice of this cake with a scoop melting slowly on top; it’s a dreamy combo!
How to Store and Reheat Leftovers
To keep your Strawberry Custard Delight Cake fresh, store it in an airtight container in the refrigerator. It’ll hold up beautifully for up to 3-4 days. If you’re planning to make it ahead, avoid adding the whipped cream until just before serving—it’ll keep it looking fresh and lovely!
As for reheating, I recommend letting it come to room temperature after taking it out of the fridge to preserve that lovely custard texture. You could also warm up a slice in the microwave for just a few seconds, but be careful! We wouldn’t want the custard to lose its creamy goodness.
Make-Ahead and Freezer Tips
This cake can be made ahead of time! The cake layers can be baked and cooled, then frozen for up to a month. Wrap each layer in plastic wrap and aluminum foil to avoid freezer burn.
For the custard, it’s best to make that fresh due to its texture. However, if you need to, you can prepare it a day in advance; just make sure to whisk it a bit before spreading it onto the layers.
Common Mistakes to Avoid
- Overmixing: Resist the urge to mix too vigorously after adding the flour—this can lead to a dense cake!
- Not Cooling Cake Completely: If the cake layers are still warm, they may collapse when layered, leading to a messy dessert.
- Underestimating the Chill Time: I promise, it’s worth waiting for those flavors to meld together!
Frequently Asked Questions (FAQ)
1. Can I use frozen strawberries?
Absolutely! Just make sure to thaw and drain them before using; otherwise, they might add too much moisture.
2. How can I make the cake more chocolatey?
Feel free to fold in some cocoa powder into the batter for a chocolate twist!
3. What if my custard doesn’t thicken?
If this happens, it could be due to not cooking long enough, so make sure to stir continuously and watch for that magical change in texture.
Cooking Tools You’ll Need
- Mixing bowls
- Handheld or stand mixer
- Whisk
- Rubber spatula
- Measuring cups and spoons
- 9-inch round cake pans
- Saucepan
- Wire cooling rack
Final Thoughts
As I wrap up this love letter to the Strawberry Custard Delight Cake, I can’t help but smile at every step taken in this recipe. It’s not just about the end product; it’s about the journey—each layer, every mishap, and all the memories created along the way. It’s moments like these that remind us of why we cook and bake: to create joy and bring people together.
I invite you to have a go at this recipe and make it your own. Share your journey, your failures, and triumphs, because that’s what makes cooking so special.
If you enjoyed this recipe, don’t forget to save it on Pinterest or share it with a friend!

Strawberry Custard Delight Cake
Ingredients
For the Cake
- 2 ½ cups all-purpose flour The foundation of our cake; it provides structure.
- 2 ½ tsp baking powder Helps create fluffiness in the cake.
- ½ tsp salt Enhances the sweetness.
- 1 cup unsalted butter (softened) Adds richness and moisture.
- 1 ½ cups granulated sugar Provides sweetness.
- 4 large eggs Bind everything together.
- 1 tsp vanilla extract Adds warmth and depth.
- 1 cup milk Creates a soft crumb.
For the Custard Filling
- 2 cups whole milk Extra creaminess for the custard.
- ½ cup granulated sugar Balances the flavors of eggs and vanilla.
- 3 tbsp cornstarch Essential for a stable custard.
- 4 large egg yolks Bring richness to your custard.
- 2 tbsp unsalted butter Adds creaminess.
- 1 tsp vanilla extract Enhances flavor.
For the Decoration
- 2 cups fresh strawberries (diced, plus whole for topping) Must be juicy and ripe.
- to taste units whipped cream For decorating the cake.
Instructions
Preparation
- Preheat the oven to 350°F (175°C). Grease and flour two 9-inch round cake pans.
- In a bowl, whisk together flour, baking powder, and salt.
- In another bowl, cream butter and sugar until light and fluffy. Beat in eggs, one at a time, then vanilla.
- Alternate adding the dry mixture and milk until smooth.
Baking the Cakes
- Divide batter into pans and bake for 25-30 minutes, or until a toothpick comes out clean.
- Cool completely in the pans for about 10 minutes, then transfer to a wire rack.
Making the Custard
- Heat milk until warm in a saucepan.
- In a bowl, whisk together sugar, cornstarch, and egg yolks.
- Slowly pour in the warm milk while whisking.
- Return mixture to saucepan and cook over medium heat, stirring until thickened, about 5-7 minutes.
- Remove from heat, stir in butter and vanilla, and cover with plastic wrap.
Layering the Cake
- Slice each cake layer in half horizontally for four layers.
- Spread custard on top of each layer, alternating with diced strawberries.
- Top the last layer with custard, garnish with halved strawberries, and pipe whipped cream around edges.
Chilling
- Chill the cake for 1-2 hours before serving to enhance flavors.