
Easy Lemon Oatmeal Crumble Bars: A Delicious Treat
Sometimes a recipe sticks with you, doesn’t it? You can’t quite recall how you found it, but it’s become a staple in your life. For me, that recipe is the Lemon Oatmeal Crumble Bars. Oh, how I love these little gems! They remind me of lazy summer afternoons spent in my grandma’s kitchen, the sun streaming through the window, and the aroma of fresh lemons blending with oats wafting through the air.
It all started with a kitchen disaster, of course. I was determined to impress my friends with my baking skills, but things didn’t quite go as planned. The first time I attempted these crumble bars, I forgot to add the sugar. Yes, you read that right! When my friends took a bite, their expressions were priceless – a mixture of confusion and disappointment that I’ll never forget. That moment turned a little sour, but I learned to read the recipe before diving in, and now these bars have firmly established themselves as a beloved treat in my repertoire.
I bake them every chance I get, and honestly, they’re so easy and comforting that I often find myself sneaking one (or two) right from the pan while they’re still warm. There’s something uniquely delightful about the crunchy oatmeal topping against the tangy lemon filling. It’s like a little hug from grandma, and who doesn’t need that sometimes? So grab your apron, and let’s get started on these easy, delicious, and healthy comfort food bars that will have you and your loved ones coming back for seconds!
Why You’ll Love This Recipe
- Quick to Make: Perfect for those who want a delicious treat without spending all day in the kitchen.
- Picky-Eater Approved: Even my cousin, who has a very selective palate, devours these bars!
- Meal Prepping Win: Make a batch on Sunday to enjoy as a quick afternoon snack or breakfast throughout the week.
- Versatile Recipe: While lemon is my favorite, you can experiment with other fruits, too.
- No Special Equipment Needed: Just a bowl, a mixing spoon, and a baking dish.
- Feels Like a Hug: The warm, zesty flavors will wrap around you in the best way possible.

What Makes This Recipe Special?
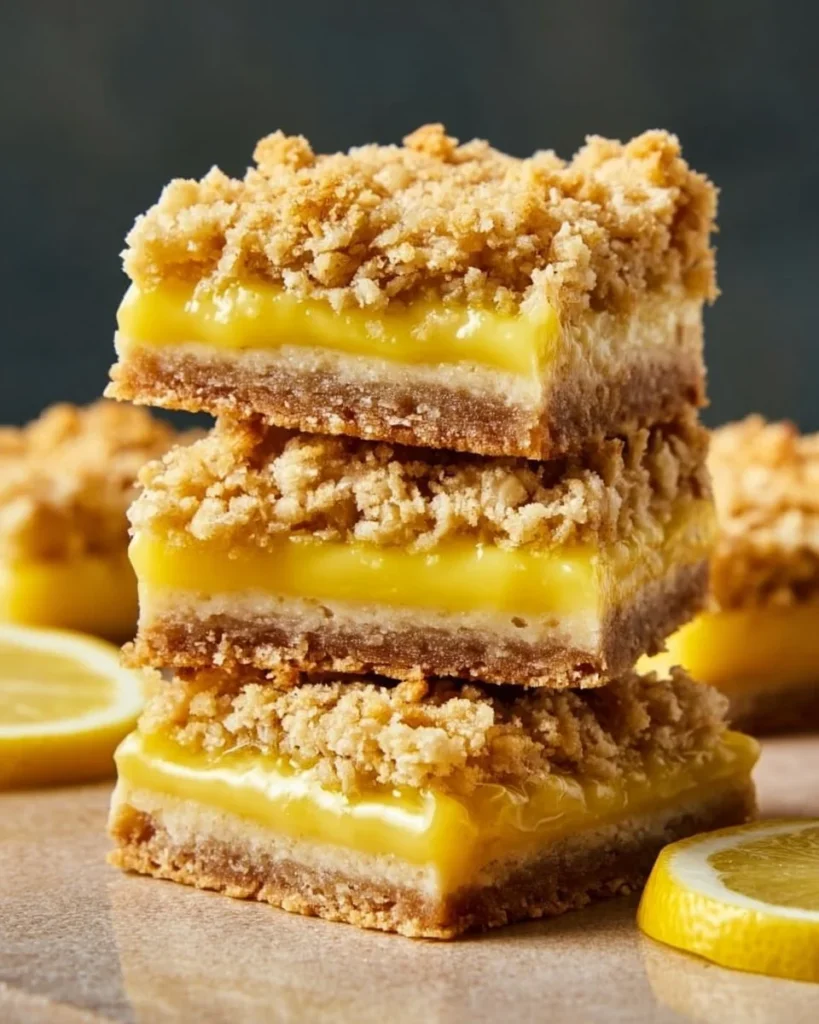
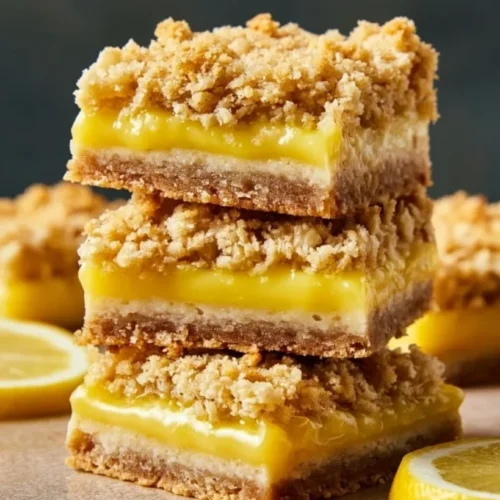
These Lemon Oatmeal Crumble Bars stand out because of their layer of fresh lemon juice and zest, which lend a vibrant brightness to the sweetness of the crumble. The combination of oats and flour creates a delightful texture—a satisfying crunch with every bite. There’s something magical about the way these flavors dance together, where sweet and tart meet in perfect harmony. It’s like a summer picnic for your taste buds!
But let’s not forget the memories tied to them. This recipe makes me think of family gatherings, lazy weekend brunches, and even potluck dinners where they always disappear first. It’s that shared joy of indulging in something homemade that binds us all together. Plus, if you’re trying to impress, these crumble bars are stunning in presentation—golden, textured, and invitingly fragrant. Who wouldn’t want to dive in?
Ingredients
- 1 cup rolled oats: Oats provide a hearty texture and are a great source of wholesome goodness, making these bars feel like healthy comfort food.
- 1 cup all-purpose flour: A must for binding everything together. You could swap this for whole-wheat flour for an even heartier version.
- 1/2 cup brown sugar: For that deep, caramel-like sweetness that complements the lemon beautifully.
- 1/2 cup granulated sugar: Just to make sure we have enough sweetness to balance the tartness of the lemon.
- 1/2 cup unsalted butter, softened: This gives the bars that melt-in-your-mouth quality and binds all the ingredients nicely.
- 1/2 teaspoon baking soda: Helps to give the bars a slight rise.
- 1/4 teaspoon salt: Enhances all the flavors. Don’t skip this step; it makes a difference!
- Zest of 1 lemon: The zest adds brightness and fragrance, making you feel like you’re on a sunny beach vacation with every bite.
- 1/4 cup fresh lemon juice: Key player in balancing the sweetness and bringing that refreshing zing.
- 1/4 cup powdered sugar (for glaze, optional): A drizzle of powdered sugar glaze adds the final touch, but it’s totally optional. Sometimes, I like to keep it simple.
Here’s a tip: I’ve experimented with different brands of butter and have found that grass-fed butter makes a noticeable difference in flavor if you want to indulge a bit more.
But let me share a "don’t do this" moment: Once, I accidentally used baking powder instead of baking soda, thinking I could swap them out like some magical kitchen alchemist. Spoiler alert: The bars turned out more like fluffy lemon cake than the dense, crumbly texture I was aiming for. Lesson learned—read labels, folks!
How to Make It Step-by-Step
Alright, friends, it’s time to roll up those sleeves and dive into the method of making these delightful bars. Trust me; you don’t need to be a seasoned chef—if I can do it, so can you!
1. Preheat and Prep
First things first, preheat your oven to 350°F (175°C). This is a must-do so your crumble bars can bake evenly. While that warms up, grab an 8×8 inch baking dish and give it a good greasing. I typically use cooking spray, but parchment paper works wonders too if you want to ensure those bars pop out easily later.
2. Mix the Dry Ingredients
In a large bowl, combine the oats, flour, brown sugar, granulated sugar, baking soda, salt, and lemon zest. Just the sight of the lemon zest swirling together with the dry ingredients gets me excited! The scent is already pulling me in—so fresh and invigorating.
Make sure all the ingredients are well mixed; we don’t want any pockets of brown sugar or baking soda lurking around, waiting to make a surprise appearance when you bite into the bars.
3. Add the Butter
Now, let’s get buttery! Add the softened butter to your dry mix. Using a fork or your trusty fingers, combine everything until you achieve a crumbly texture. Honestly, this stage can feel a bit like a toddler art project (a little messy but oh-so-fun!). Some parts should be sandy, and others should resemble pea-sized crumbs. Don’t stress about achieving uniformity here—it’s about that rustic look!
4. Form the Base
Once you’ve got that delightful mix, take half of it and press it into the bottom of your prepared baking dish. Think of it as creating a sturdy foundation for the lemony goodness to build on. Press down firmly, but don’t go overboard; we’re not trying to create a stone slab here!
5. Add the Lemon Juice
Now, in a separate smaller bowl, combine the fresh lemon juice with optional powdered sugar for that sweet glaze. Whisk it together until it’s all smooth and drizzle-worthy. The first time I did this step, I accidentally added too much lemon juice (because more is better, right?), and it turned into a bit of a lemon puddle. Oops! But I learned just a simple drizzle goes a long way, so go easy on it!
Now, drizzle that tart, zesty mixture over your pressed base. It should look beautiful, and I promise you’ll wish you could bottle that lemony fragrance!
6. Top with Crumble
Grab the rest of your crumble mix and sprinkle it on top of the lemon juice layer. I like to do this by pinching small amounts in my fingers and letting it fall evenly—the extra texture is just fabulous!
7. Bake to Perfection
Pop that dish in the preheated oven and set your timer for about 25-30 minutes. As it bakes, your kitchen will smell like a cozy bakery! The bars will turn golden brown at the edges, indicating it’s almost time to pull them out.
8. Let Cool and Cut
Once they’re done baking, allow them to cool in the pan for at least 10-15 minutes before cutting them into squares. This step is essential! If you try to cut them too early, you’ll encounter a gooey mess—even though it might still taste absolutely divine.
Once they’ve cooled a bit, slice them up using a sharp knife, and try not to eat them all at once!
Tips for Best Results
- Quality Over Quantity: Use fresh lemons for zest and juice. I promise it makes a world of difference in flavor.
- Room Temperature Butter: Make sure your butter is softened, not melted. If it’s too warm, your bars are at risk of becoming a greasy mess.
- Don’t Skip Cooling: Letting them cool in the pan helps them set. Patience is key, my friend!
- Bake Evenly: If your oven is like mine and tends to have hot spots, rotate the pan halfway through baking to ensure consistent color and texture.
Ingredient Substitutions & Variations
- Gluten-Free: Swap the all-purpose flour for a gluten-free blend. Make sure that your oats are certified gluten-free.
- Add Nuts: Mix in some chopped nuts with the crumble for an added crunch—think walnuts or almonds!
- Fruit Medley: Feel like mixing it up? Swap the lemon for another fruit like blueberries or raspberries for a twist, or throw them in with the lemon for a vibrant berry-lemon combo.
Directions
- Preheat oven to 350°F (175°C); grease an 8×8 inch baking dish.
- In a bowl, combine oats, flour, brown sugar, granulated sugar, baking soda, salt, and lemon zest.
- Add the softened butter, combining to a crumbly texture.
- Press half of the mixture into the bottom of the baking dish for the base.
- In another bowl, mix fresh lemon juice with powdered sugar (if using). Drizzle over the base layer.
- Sprinkle the remaining crumble mixture on top.
- Bake for 25-30 minutes until golden brown.
- Cool, cut, and enjoy!

Pairing Ideas (Drinks, Sides, etc.)
Let’s talk pairings! These bars are perfect with a hot cup of tea or coffee—imagine curling up on the couch with a warm mug in hand and these tasty treats! They also make a cozy breakfast paired with some yogurt or fresh fruit.
And if you’re feeling fancy, whip up a batch of homemade whipped cream to slather on top—because why not?
How to Store and Reheat Leftovers
After you’ve enjoyed your initial batch, let any leftover bars cool completely before storing them in an airtight container. They can be kept at room temperature for about a week. (But let’s be real—there’s a good chance they won’t last that long!).
If you want to keep them longer, these bars freeze beautifully! Just wrap them in plastic wrap, then place them in a Ziploc bag. When you’re craving a snack, pull them out and let them thaw at room temperature.
Make-Ahead and Freezer Tips
Want to get ahead of the game? You can make these bars a day in advance. They taste even better the next day as the flavors deepen and meld. Alternatively, if making them for later use, prepare, bake, and freeze them before cutting. When you need a treat, just let them thaw and slice!
Common Mistakes to Avoid
- Rushing the Cooling Process: Patience is key. Cooling is not just a guideline; it’s a necessity.
- Using Old Oats: Check your expiration date! Old oats can lend a stale flavor, and no one wants that.
- Overmix: When combining the dry ingredients and butter, mix just until combined. Overworking the dough can lead to tough bars—nobody wants that chewiness when you’re after crumbly perfection.
Frequently Asked Questions (FAQ)
Q: Can I use quick oats instead of rolled oats?
A: Yes! But keep in mind that they will yield a slightly different texture—quicker oats tend to produce softer bars.
Q: What if I don’t have fresh lemons?
A: While fresh lemons are best, you can use bottled lemon juice in a pinch. Just keep in mind that the flavor will be less vibrant.
Q: Can I make these bars vegan?
A: Absolutely! Swap the butter for coconut oil or vegan butter, and use a plant-based flour substitute.
Q: How can I tell when the bars are done baking?
A: They should be golden brown at the edges. You can also do the toothpick test—it should come out mostly clean but with a few crumbs (not goo).
Q: Will they still taste good if I make them gluten-free?
A: Yes! As long as you’re using gluten-free oats and flour, they’ll be just as delicious!
Cooking Tools You’ll Need
- Mixing bowls (one large and one small)
- Measuring cups and spoons
- An 8×8 inch baking dish
- A whisk for combining liquids (and a fork if you want to get those butter crumbles going)
- A sharp knife for slicing your bars
Final Thoughts
As I sit here, fingers dusted with leftover crumbs, I can’t help but smile at the memories tied to these Lemon Oatmeal Crumble Bars. They’ve transitioned from a fluke recipe to a family favorite, all thanks to a little persistence (and a few honest mistakes).
I hope you find as much joy in making these as I do—there’s something incredibly special about sharing food with loved ones. So, if you enjoyed this recipe, don’t forget to save it on Pinterest or share it with a friend! There’s love in baking, and I can’t wait for you to experience it, too! Happy baking!
Lemon Oatmeal Crumble Bars
Ingredients
For the Crust and Topping
- 1 cup rolled oats Provides a hearty texture.
- 1 cup all-purpose flour Can be substituted with whole wheat flour.
- 1/2 cup brown sugar Adds deep caramel-like sweetness.
- 1/2 cup granulated sugar To balance the tartness of the lemon.
- 1/2 cup unsalted butter, softened Gives buttery richness.
- 1/2 teaspoon baking soda Helps the bars rise slightly.
- 1/4 teaspoon salt Enhances all flavors.
- 1 lemon zest of Adds brightness and fragrance.
For the Lemon Filling
- 1/4 cup fresh lemon juice Balances sweetness with refreshing zing.
- 1/4 cup powdered sugar (for glaze, optional) Adds a sweet glaze if desired.
Instructions
Preparation
- Preheat oven to 350°F (175°C) and grease an 8x8 inch baking dish.
- In a bowl, combine rolled oats, flour, brown sugar, granulated sugar, baking soda, salt, and lemon zest.
- Add softened butter, combining until crumbly texture is achieved.
- Press half of the mixture into the bottom of the baking dish for the base.
Adding the Lemon Filling
- In another bowl, mix fresh lemon juice with powdered sugar (if using). Drizzle this mixture over the pressed base.
- Sprinkle the remaining crumble mixture on top.
Baking
- Bake for 25-30 minutes until golden brown at the edges.
- Let cool in the pan for 10-15 minutes before cutting into squares.


