Easy Cheesy Garlic Chicken Wraps: The Perfect Weeknight Dinner
Gather ’round, food lovers! Today, I’m diving into a recipe that is as comforting as a warm hug on a chilly night. Picture this: it’s been a long day, the kids are bouncing off the walls, and all you want is something quick but hearty to fill your bellies. Enter my Ooey-Gooey Cheesy Garlic Chicken Wraps! These beauties are not just another one of those easy weeknight dinners—they’re a sensory delight, packed with flavor and ooey-gooey goodness that will have your family raving and, most importantly, asking for seconds.
I remember the first time I made these wraps. I was chaotically juggling my toddler’s demands, the cat trying to steal the chicken off the counter, and the overwhelming pressure of dinner prep looming over me. In my kitchen chaos, I thought, “Okay, let’s whip up something delicious without having to deep dive into ten pan dishes or gourmet techniques.” I gathered what I had on hand, and voila! A simple combination of shredded chicken, cheese, and colorful veggies—all wrapped snugly in a tortilla—created a moment I’ll always cherish. That first melty, cheesy bite was… well, let’s just say it felt like magic, and honestly, I was hooked.
You could say this recipe is more than just food; it’s my go-to for cozy family nights, stress-free entertaining, or even a lazy Sunday brunch, because who says wraps are only for dinner, right? The best part? You can feel great serving them up, knowing they’re packed with protein and loaded with nutrients—perfect for those healthy comfort food vibes!
So, get ready to cook your way to deliciousness. We’re going to fill the air with garlic aromas that will make everyone come to the kitchen, and you’ll soon find that this recipe is undoubtedly the most comforting dish you never knew you needed.
Why You’ll Love This Recipe
- Quick & Easy: In under 30 minutes, you can have a delicious meal ready. Perfect for those chaotic weeknights!
- Family-Friendly: Picky eaters? No problem! Everyone loves cheesy wraps, and you can customize the fillings.
- High Protein: With chicken and cheese, you’ve got yourself a protein-packed meal that keeps you energized.
- Meal Prep Winner: These wraps store beautifully, whether you make them ahead for lunches or freeze for later.
- Versatile & Flexible: You can mix and match ingredients based on what’s in your fridge or what your family loves.
- Comfort in Every Bite: Seriously, each mouthful feels like a warm embrace, filled with melted cheese and savory chicken!
What Makes This Recipe Special?
This recipe stands out for a few key reasons. First, the combination of garlic and cheese is guaranteed to give your taste buds a dance party! The garlic isn’t just a background flavor; it shines through, adding a punch that balances perfectly with the creamy melted cheese.
Secondly, I love how customizable it is. While I stick to some classic ingredients, feel free to toss in whatever veggies are hanging out in your fridge—zucchini, spinach, or even some roasted sweet potatoes for a sweet twist. The world is your oyster, my friends! Lastly, these wraps come together in one skillet, which means less cleanup and more time to enjoy your meal.
Ingredients
Let’s talk about the delightful components of our Ooey-Gooey Cheesy Garlic Chicken Wraps. Grab your apron and get ready!
-
1 lb Chicken Breast, Cooked and Shredded: The star of the show! This ingredient is not only rich in flavor but also a high protein meal option that will keep you full. You can use rotisserie chicken for an even quicker fix—trust me, it’s a game-changer!
-
1 Cup Shredded Cheese: I prefer using a blend of cheddar and mozzarella for that ultimate stretchy cheese experience, but feel free to use what you love—pepper jack for a spicy twist, anyone? Just don’t skimp; cheese is a vital player here.
-
2 Cloves Garlic, Minced: Garlic is life! It brings a robust aroma and flavor that pairs beautifully with chicken and cheese. I get excited when I hear that little sizzle of garlic hitting the hot pan!
-
4 Large Tortillas: Flour or whole wheat, your call! I lean towards flour for that soft and pliable texture that wraps around the filling like a cozy blanket.
-
1 Cup Mixed Vegetables (Bell Peppers, Onions, etc.): Use whatever you have! Bell peppers give a lovely crunch and sweetness, while sautéed onions add depth. Green beans or corn can also strut their stuff in this dish!
-
1 Tablespoon Olive Oil: A must for sautéing those veggies and lending a lovely golden hue.
-
Salt and Pepper to Taste: Essential for elevating the flavors. Don’t skip this step!
Pro Tip: Don’t be afraid to play around with spice blends or fresh herbs to elevate your wraps even more. A pinch of cumin or paprika can add some beautiful warmth, and don’t forget the fresh cilantro or parsley if you’re feeling it!
How to Make It Step-by-Step
Let’s get into the nitty-gritty—this is where the magic happens. Follow along, and I promise you’ll find joy in every step!
Step 1: Sautéing the Garlic
Start by heating up that glorious olive oil in a large skillet over medium heat. The moment you add the minced garlic, you’ll be treated to an amazing aroma wafting through your kitchen. Seriously, it’s blissful. Sauté the garlic until it’s fragrant but be careful not to let it burn. Trust me, burnt garlic is like finding a hair in your food—nobody wants that!
Step 2: Add Chicken and Veggies
Next, toss in the cooked, shredded chicken and your colorful mixed vegetables! This is where the magic truly starts to happen. As you stir them together, the smell will be absolutely intoxicating. Sauté them until they’re heated through and the veggies are slightly tender—think two to three minutes.
Step 3: Season to Perfection
Time to bring your dish to life with a sprinkle of salt and pepper. This isn’t just seasoning; it’s bringing all those flavors together, creating a symphony in your skillet. I like to taste at this point—oops, and sometimes I sneak a bite or two because, let’s be real, quality control is essential!
Step 4: Melt in the Cheese
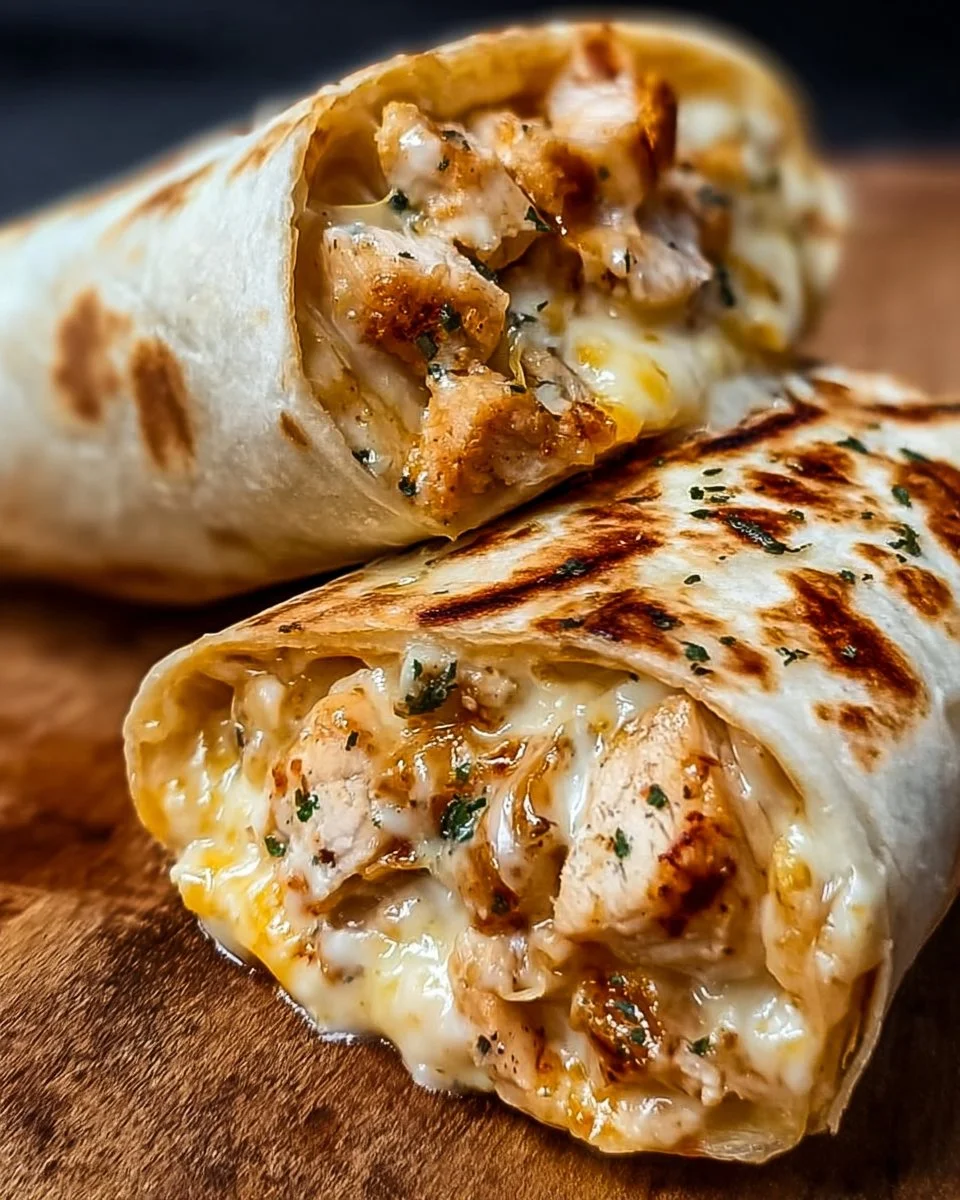
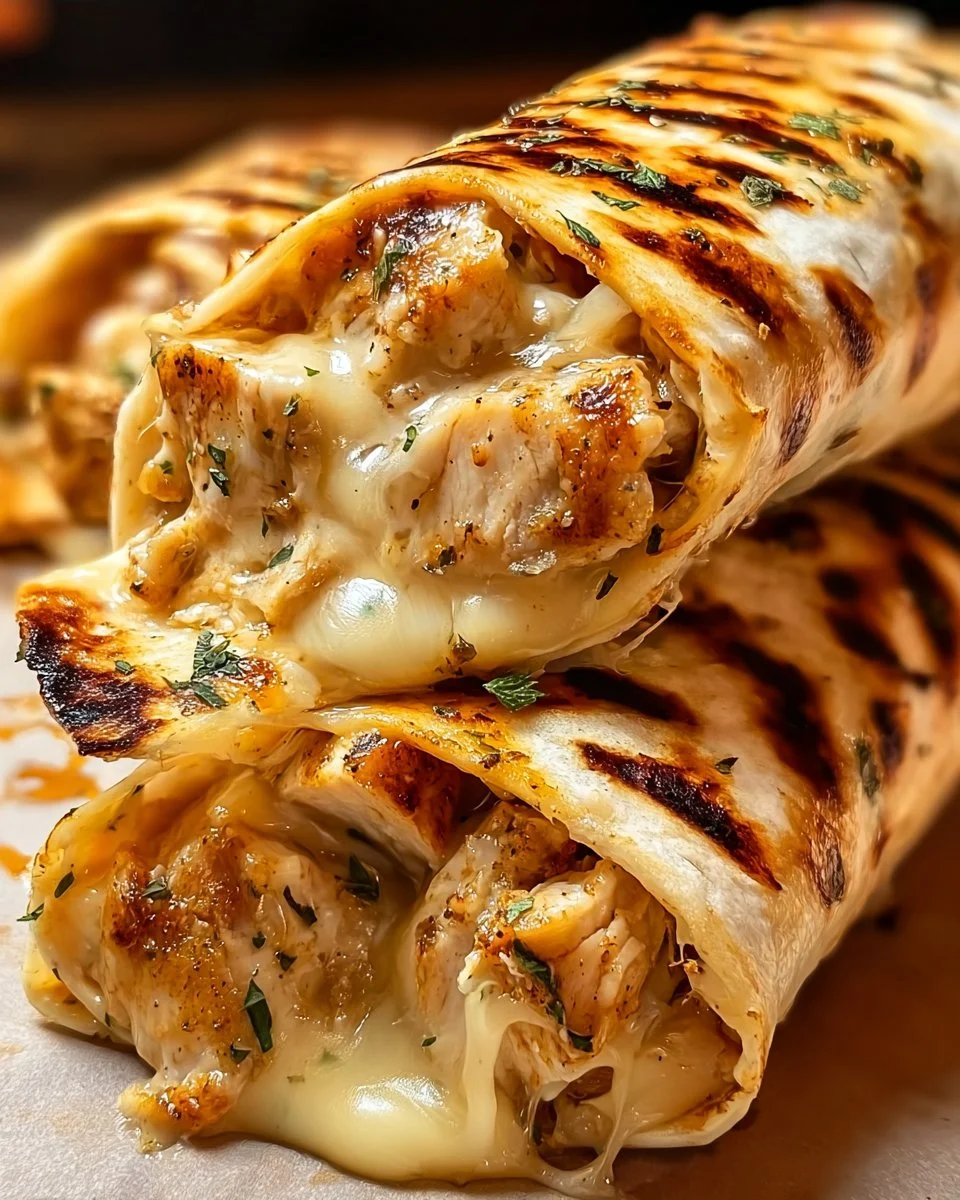
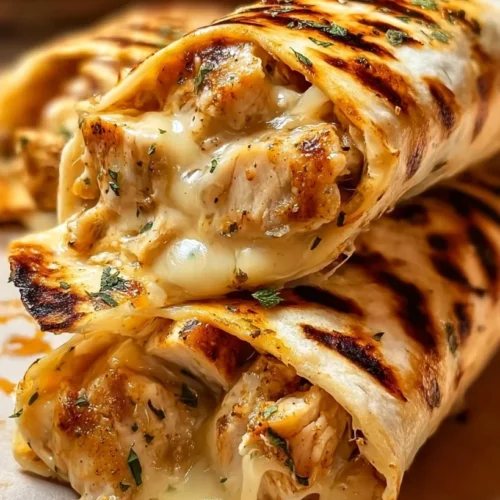
Once the mixture is heated, take it off the heat and stir in the shredded cheese. The second the cheese hits that warm chicken and veggie medley, it starts to melt into the most glorious cheesy goodness. This is your ooey-gooey moment! It’s thick, creamy, and honestly just what we need after a long day.
Step 5: Assemble Your Wraps
Grab your tortillas! Place a generous portion of the chicken and cheese mixture on each tortilla. Don’t skimp on the filling; it’s the heart of the wrap. Roll them up tight, making sure to tuck in the ends—no one wants a messy wrap that spills its guts all over the plate!
Step 6: Optional Toasting
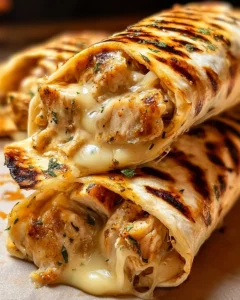
If you’re feeling a little fancy and want that crispy exterior, toss the wraps back into the skillet. Give them a quick toast for a couple of minutes on each side until they’re golden brown and crispy. The sound of that first crunch when you take a bite? Oh, to die for!
Step 7: Serve Warm
Cut those wraps in half and serve them up warm! Consider garnishing with a sprinkle of fresh herbs or a side of your favorite dipping sauce. Pairing them with a light side salad or some homemade fries would elevate your meal even more.
As you dig in, the creamiest, cheesiest, and garlicky flavors envelop each bite, creating a comfort that lingers on the palate.
Tips for Best Results
To ensure every time you make these wraps is a success, here are a few tricks I’ve learned:
- Don’t Rush the Cheese: Give it a moment to melt before rolling, and be sure to stir well for an even distribution.
- Experiment with Fillings: Mix up the veggies based on what’s in season or take advantage of leftovers!
- Perfect Tortilla Tuck: When rolling, remember to fold in the sides first before rolling up; it helps keep the filling inside and makes it easier to eat.
Ingredient Substitutions & Variations
If you’re focused on healthy eating or have specific dietary needs, here are some substitutions to consider:
- For a Keto Meal Plan: Swap regular tortillas for low-carb or lettuce wraps, and choose cheese with higher fat content.
- For Vegan Options: Use plant-based chicken alternatives and vegan cheese; yes, they melt too!
- Seasonal Variations: Roasted butternut squash in the fall or fresh summer zucchini are delightful upgrades based on what’s fresh and what you have on hand.
- Mix Different Cheeses: Try blending cheeses—goat cheese, feta, or even blue cheese for an unexpected flavor twist!
Directions
- In a skillet, heat olive oil over medium heat. Add minced garlic and sauté until fragrant.
- Add the cooked chicken and mixed vegetables to the skillet. Season with salt and pepper, and stir until heated through.
- Remove from heat and stir in the cheese until melted.
- Place a portion of the chicken and cheese mixture on each tortilla.
- Roll up the tortillas to form wraps.
- Optional: Toast the wraps in the skillet until crispy and golden.
- Serve warm.
Pairing Ideas (Drinks, Sides, etc.)
These cheesy wraps pair beautifully with so many options! A light green salad with a zesty vinaigrette cuts through the richness of the cheese, while a side of baked sweet potato fries adds a sweet crunch. For drinks, a refreshing lemonade or iced tea is perfect, but I won’t judge if you decide to go for a cold beer instead!
How to Store and Reheat Leftovers
When storing leftovers, wrap these in aluminum foil or an airtight container—trust me, it makes all the difference. They keep well for about three days in the fridge. To reheat, you can pop them back into the skillet for a quick toast or heat in a microwave. Just don’t expect that lovely crispiness, but they’ll be just as yummy!
Make-Ahead and Freezer Tips
These wraps are freezer-friendly! Prepare a batch, roll them up tightly, and wrap in foil before placing them in a freezer bag. They can be frozen for up to three months. When you’re ready to enjoy them, just thaw in the fridge overnight and follow the reheating instructions mentioned above. A quick meal in minutes!
Common Mistakes to Avoid
- Overcooking the Garlic: This can make it bitter, so keep a close eye on it!
- Not Seasoning Enough: Don’t skip the salt and pepper; they truly elevate the dish’s flavors.
- Filling Too Much: It’s tempting to overstuff, but leaving some room for rolling will save you from messy situations.
Frequently Asked Questions (FAQ)
Can I use frozen chicken for this recipe?
Absolutely! Just ensure it’s fully cooked and shredded before tossing it in with the veggies.
What can I do if I don’t have tortillas?
You can use pita bread, lettuce leaves, or even make a cheesy chicken casserole by baking it in a dish with cheese on top.
Is this healthy for meal prep?
Yes! These wraps are a balanced meal filled with protein and veggies, making them lovely for meal planning chicken!
Can I double the recipe?
Feel free! Just ensure your skillet is big enough or make it in batches.
Cooking Tools You’ll Need
- A non-stick skillet for sautéing
- A wooden spoon or spatula for mixing
- A sharp knife and cutting board for chopping veggies
- Aluminum foil or wax paper for wrapping the wraps
Final Thoughts
These Ooey-Gooey Cheesy Garlic Chicken Wraps have become a cherished part of our family dinners, and I genuinely hope they find a special spot in yours, too. Cooking isn’t just about following a recipe; it’s about creating moments and sharing good food with loved ones. So go ahead—get those ingredients together, strap on that apron, and let’s make some magic in the kitchen!
If you enjoyed this recipe, don’t forget to save it on Pinterest or share it with a friend! Happy cooking!
Ooey-Gooey Cheesy Garlic Chicken Wraps
Ingredients
Main Ingredients
- 1 lb Chicken Breast, Cooked and Shredded Use rotisserie chicken for a faster option.
- 1 cup Shredded Cheese Blend of cheddar and mozzarella preferred.
- 2 cloves Garlic, Minced Fresh garlic enhances the flavor.
- 4 large Tortillas Flour or whole wheat based on preference.
- 1 cup Mixed Vegetables (Bell Peppers, Onions, etc.) Use whatever you have on hand.
- 1 tablespoon Olive Oil For sautéing vegetables.
- to taste Salt and Pepper Essential for flavor enhancement.
Instructions
Preparation
- Heat olive oil in a large skillet over medium heat.
- Add minced garlic and sauté until fragrant, being careful not to let it burn.
- Add the cooked, shredded chicken and mixed vegetables. Sauté until heated through, about 2-3 minutes.
- Season with salt and pepper.
- Remove from heat and stir in shredded cheese until melted.
- Place a portion of the chicken and cheese mixture on each tortilla.
- Roll up the tortillas tightly, making sure to tuck in the ends.
- For optional toasting, return the wraps to the skillet and toast until golden brown and crispy.
- Serve warm, optionally garnished with fresh herbs.